Recently I was asked to make unicorn goodies for a bachelor party, as the bachelor in question is a big fan of unicorns. Initially I was just asked to make cupcakes, but when I mentioned I’d seen a video on how to make unicorn cookies that poop sprinkles and had wanted to try that, my friend nearly exploded with glee.
The video in question is from My Cupcake Addiction and can be seen here. I’m going to tell you right up front that my experience making these cookies was very different than hers, and not only because I didn’t follow her instructions quite.. exactly…
Step one: I made the sugar cookie dough, and dyed it all the fun colors. I also dyed my fingers a little, but not too badly. I wrapped them all in plastic wrap and stuck them in the fridge for a while.

Next was the part where you roll each color out and wrap it around and freeze it and repeat and repeat. I wish I’d taken more photos during this process, because it was SO not as neat and tidy as her video makes it seem. Not even a little.
First color, yellow, okay, fine, easy.
Second color: orange…. okay, not too bad… I didn’t just roll it out in a tidy little rectangle and roll it around, but I managed. Sort of squished it around the yellow.
Third color: green. Um. Okay. So I definitely don’t have enough to wrap around all the rest. What’s going on here? I feel like I cut my dough pretty well like she did. (Note: later I realized that I was supposed to do green, then orange, not the other way around. Derp.)
Fourth color: magenta. I’m really struggling now. I’m rolling the colors out and trying to make long rectangles like she does in her video, but it is just NOT happening. Basically I’m rolling long skinny ovals, wrapping that around, and then just plastering dough all over the exposed places and mushing it together and then rolling the whole thing to try to make it smooth-ish. I’m freezing the whole log in between rounds, but it’s not going great. This is how it continues until I’m done.

So I freeze the log for a while. I may have been sort of skimming the video as I worked, so I didn’t in fact notice that she said she froze hers for six hours until much later. Even if I had, it was already late and the first part had taken WAY longer than I thought it would, so there was no way I was dedicating six hours to just freezing dough at this point. I think I froze it for… 20 minutes? Good enough, right?
I took it out and cut off the uneven ends, which I thought ended up looking kind of like Play-Doh flowers.

Next, slice the log into fairly thick slices to roll out, and each slice becomes one cookie. This is where my lack of freezing foiled me, and I wasn’t good about putting it back in the freezer while I worked even though it was 800 degrees in the kitchen (give or take), so as you can see the log flattened on the bottom when I cut into it. Oooops.


Back in the freezer for a bit… try again… better!

Each of those sushi-roll-looking circles of dough gets rolled 1/4″ thick and cut into a single unicorn. There were a few instances where the dough didn’t spread quite enough for my cookie cutter, so I just took a bit of extra dough and tucked it onto the side where the horn would be – you can see on some of these that the rainbow starts over at the horn. It’s not very noticeable and still pretty, so I think I got away with that little cheat.


For every cookie, you need two of these – one for the top and one for the bottom. I needed to make two dozen of these, and I had underestimated how much perfect-rainbow dough that would take, and how much I would fail at the perfect-rainbow logs, so I quickly ran out of my little rainbow sushi-rolls. All I had was a bowl of scraps – did I mention keep the scraps? KEEP THE SCRAPS. It’s very tempting to eat them all, but limit yourself. You need these.

I decided the bottom cookies didn’t have to be perfect – they could be Picasso Unicorns! I chose scrap pieces that had the most color in them and carefully smooshed them together. I didn’t want to roll them up because then the colors would mix, as the lovely Cupcake Addiction lady mentions in her video (see, I did watch parts of it! but also that’s pretty obvious). I also decided the bottom cookies didn’t necessarily need to be 1/4″, so to save dough I made them 1/6″.
Side note: if you don’t already have attachments for your rolling pin to measure height, or a rolling pin with attachments, WHAT ARE YOU WAITING FOR?!?


Now I’ve got a slew of pretty rainbow unicorns and colorful Picasso unicorns. Next step is making the center unicorns. These can be messy. You can use a knife to cut out the centers, but if you have a tiny cookie cutter, that works great. I have a tiny flower one, so that’s what I used. Once again, I smooshed together scraps and rolled them out – these you definitely want to have at at least 1/4″ thickness – but then I used the tiny cookie cutter to give them hollow centers. I found it easier to do this after transferring the unicorns to the baking pan. A whole unicorn is easier to move than a partial one. Words to live by.

It’s time to assemble the cookies. This is not a quick project by any means… what is this, step 28? In the video, she uses Nutella and melted chocolate for her “glue” – I used hot pink Wilton candy melts. It just seemed right. For the sprinkles, I used multicolored stars. The first step is to attach the middle cookie to the bottom cookie by spreading your glue on the bottom of the partial unicorn and lining it up as best as you can on the top of the bottom cookie. Almost sounds like an Abbot & Costello routine…

Add your sprinkles, then put more glue on top of the middle cookie. The easiest way to do this if you’re using melted chocolate or candy melts is to wait until it’s cool to the touch and pour it into a disposable pastry bag or ziploc bag without a tip. I just cut a very small hole in the tip of my bag and it was much faster than trying to spread the candy on the cookies with a utensil. Just don’t do it when it’s too hot or you’ll have a gross melty plastic bag on your hands. Ew.
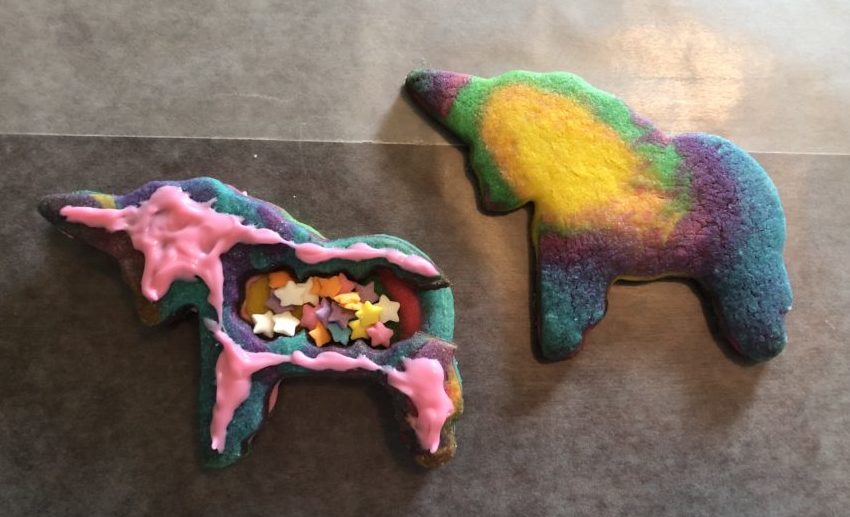
Ta-da! Three-layer unicorn cookie!

Since my cookies were traveling, I didn’t want all the sprinkles to come out in transit. If I’d thought of this before making everything, I wouldn’t have cut out the hole in the back, but here we are. So I decided to just plug the hole with more candy melt! This way, too, it was obvious where to start on the cookie, and a short path to sprinkle poos.

A whole unicorn army, ready to sprinkle stars on the party!

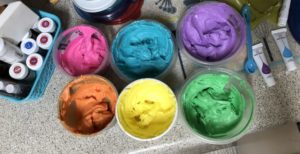
Next up were the cupcakes. Oh yes, there were also cupcakes. This bachelor party wasn’t kidding around on the unicorn theme, and I was given free reign on decorating. The cupcakes themselves were dark chocolate stout flavor, and the frosting was vanilla buttercream (bunnehcream). But then it got fun. I wanted full-on rainbow frosting. I’ve done three color swirl frosting before, but this time I wanted SIX colors. Swirled in ONE frosting.
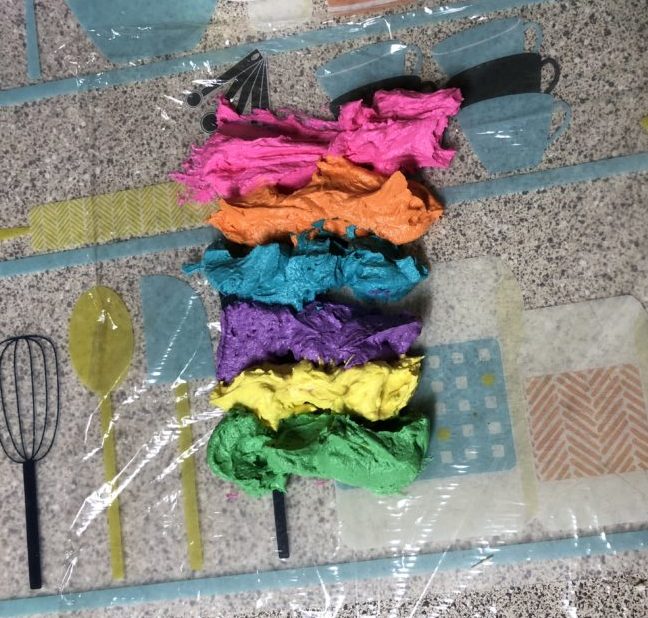
Ambitious, but I was determined. First I laid out each color side-by-side on a sheet of plastic wrap. Not too much at once, and not too thick.
Then I carefully rolled the plastic wrap up, making sure not to mix the colors or get any of them smooshed into the middle.
I very carefully smushed the plastic wrap until it was oblong and skinny at one end, and twisted the ends. Then I slid it into a pastry bag with a coupler already inside. I bounced it gently until the longer twisted end of the plastic wrap poked through the coupler, then I pulled on it until it was all the way through. I cut off the twisted bit and put on my decorating tip of choice – I used Wilton #21, a wide star tip, which happens to be my favorite all-purpose cupcake-frosting tip.

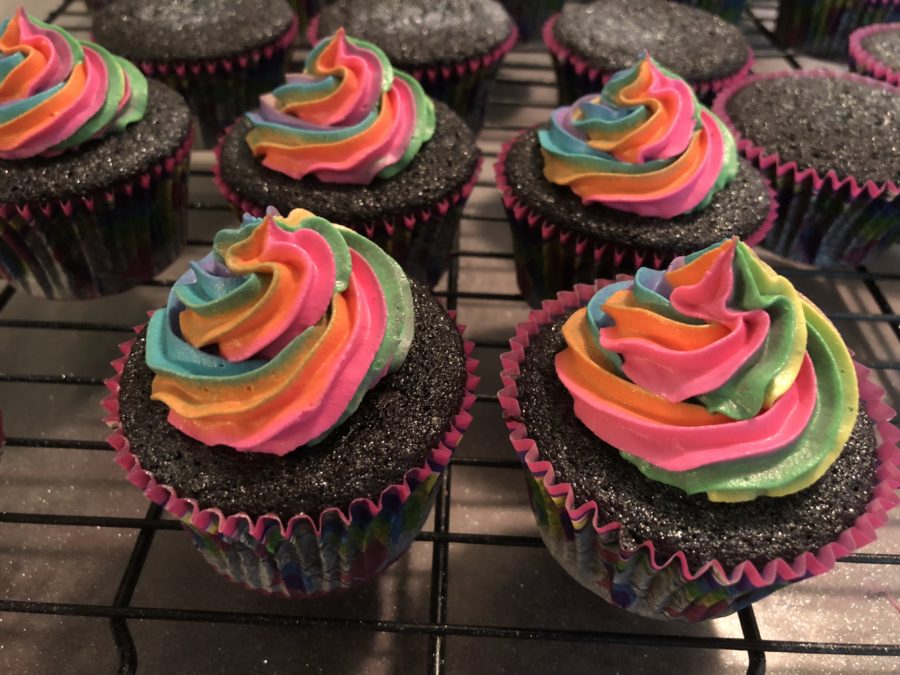
The trickiest part from there is making sure to apply even pressure while squeezing the pastry bag as you swirl so you don’t get too much of some colors and not enough of the others. I found I had to rotate the bag every few cupcakes to keep this from happening. Oh, and I definitely ordered some over-the-top unicorn cupcake liners! Of course!

Here’s what your decorating tip will look like when you take it off to reload the pastry bag with a new rainbow-frosting-plastic-wrap bullet:

I thought that was pretty cool. Once all the frosting was done, I added silver pearl dust, silver sanding sugar, and silver edible stars for a magical glittery look. These were hands-down the sparkliest cupcakes I’ve ever made.

And to complete the look, unicorn rings I found online!


I’m pretty pleased with how these turned out, especially the frosting. I don’t think I’ll ever try more than six colors, but it was fun to figure out I could do it, and how rad it looked!